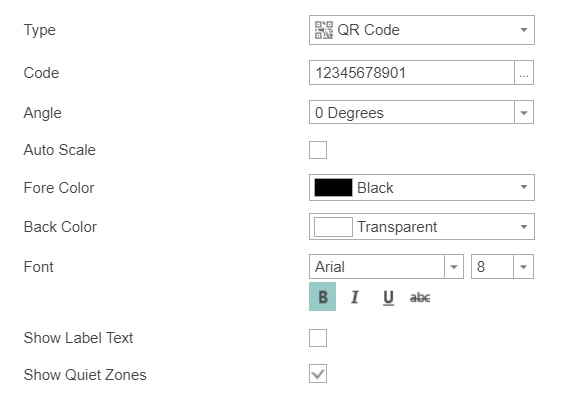
Report Designer
Barcode
A barcode is an optical machine-readable representation of data typically made up of parallel bars, varying in width, spacing, or height, which are read by barcode readers. In some cases, a line of digits can be placed under a barcode, which represents in human-readable form the data contained in the barcode. There are different ways to encode information, called bar code encoding or symbolics. Linear and two-dimensional symbolics are distinguished.
Due to different version of component using, the image and user guide for Report Designer might have slightly different from the component using in Xin 365.
Setting Barcode Data
The Code property of the Barcode component is used to specify the code of the barcode.
| Column | Description |
|---|---|
| Type | Choose the type of barcode to be used. |
| Code | Specifies a value that bar code will have. For example, you can determine a custom value. For the QR Code, it may be some text and numeric value. Also in this field, you can specify an expression. Then, the result of this expression will be the value of the barcode. Example: {Invoice.Header_Code} |
| Angle | It provides an opportunity to rotate the graphical barcode information on 90, 180, and 270 degrees. |
| Auto Scale | It provides the ability to determine the optimal scale of the bar code, taking into account the volume of information. You should know that the larger is the amount of information in a bar code, the more graphical elements are in it. So, if the bar code contains a large volume of data and, at the same time, you minimize the component size, the barcode reader could misread it. Therefore, the size of the component in the report should always be defined, taking into account the amount of information that the barcode contains. |
| Fore Color | Specifies the color of the graphical elements in the barcode |
| Back Color | Specifies the color of a background in the barcode. |
| Font | Specifies a type and style of the font for the barcode. |
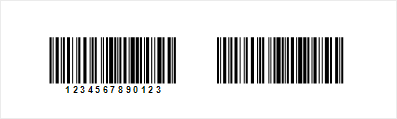
| Show Label Text | parameter allows showing/hiding the label text of the barcode. This is applicable not for all barcodes but only for those who have a labels. The label shows the value of the barcode. For example, the picture below shows two Code128 barcodes - one with a label, the other without it.
|
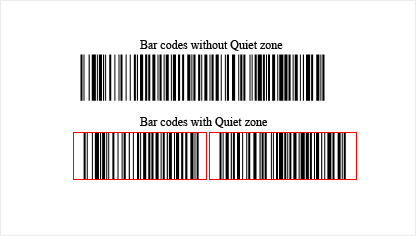
| Show Quiet Zones | It provides the ability to display or hide a quiet zone of a barcode. The Quiet zone is an empty space on the left and right side of the barcode. It is a conditional border of the beginning and end of the barcode for barcode readers. One example of the use of the Quiet zone is the case when there are several barcodes. If the Quiet zone is disabled, then the barcodes can be misread. Below is an example of two barcodes with enabled and disabled Quiet zones.
|
Barcode Sizes
Units
The mil inch system is usually used to express the density of barcode code. Firstly, it`s comfortable, because values are expressed in whole numbers. Secondly, the density of barcode code simpler connects with the resolution of print devices ability, which is usually expressed dots-per-inch (dpi). Barcode sizes are very important if they are to read successfully by scanners. Each type of barcode is defined using the following size parameters.
Module
Module parameter ("Module", sometimes referred to as the "X dimension") indicates the narrowest bar of a barcode. This parameter is connected with the printing resolution of a barcode and the barcode density. For example, if the narrowest bar is 10 mils it is said that the barcode is printed with 10 mil resolution or that the density of the barcode is 10 mil.
Density
There are two elements of density - the graphics density and information density of a barcode. A mil is used to specify the barcode density.
1 mil = 1/1000 inch
Information Density
The information density is the number of characters that can be encoded per inch given a certain X value. The smaller the value of X, the more characters can be encoded in an inch and, thus, the density rises. The information density of a barcode depends on the character encoding. The less the number of bars and spaces required to encode one symbol the higher the information density of the barcode.
Graphics Density
The graphics density of the barcode is connected with the barcode size. For example, for linear barcodes, the thinner the stroke, the higher the density (and therefore the less space the barcode takes). The classification of graphic linear barcodes is shown in the table below:
| Graphics density | Printing resolution |
|---|---|
| Very high density | < 4 mils |
| High density | 4 mils .. 6 mils |
| Medium density | 7 mils .. 13 mils |
| Low density | 14 mils .. 20 mils |
| Very low density | > 20 mils |
The above classification is approximate and depends on the type of barcode. For example, a PDF417 10 mils barcode may be considered a high-density barcode; however, a 10 mils line code can be recognized as a medium density barcode.
Information Density
The information density is the number of characters that can be encoded per inch given a certain X value. The smaller the value of X, the more characters can be encoded in an inch and, thus, the density rises. The information density of a barcode depends on the character encoding. The less the number of bars and spaces required to encode one symbol the higher the information density of the barcode.
Width
The barcode width depends on the graphic and information density. The density is limited by the resolution of the printer and scanner, but the barcode width depends on the information density of selected symbolic. With the same image density, the width of the barcode for different symbols may differ 2-3 times. The higher the print density of the barcode, the closer it should be to the scanner when reading. Therefore, for scanning from a long distance (for example, more than half a meter), the barcode must be of very low density, and accordingly the width of the barcode will be large.
Height
For linear barcodes, the vertical direction contains no information and the height of the code is determined only by the ease of scanning. A barcode that is too low is difficult for the scanner to read (it is difficult to aim the scanner so that its scan line intersects all the barcode lines). At the same time, too high a barcode height leads to an increase in the cost of labels (since the label is taller). Usually, for the majority of linear symbols, the ratio of proportions is considered the best, at which the height of the barcode is 15..20% of its width. Barcode height is also important for applications using multi-beam scanners. For example, symbols such as UPC and EAN are commonly used in trade and are often read by multi-beam scanners. For this reason, for such symbologies, the height of the barcode is made higher than recommended.
For 2D barcodes, the character height is determined by the selected print resolution, the amount of data to be encoded, and other barcode parameters.
Spaces
This is a very important attribute, especially for linear barcodes. Spacing is the light areas at the start and the end of the barcode. They are required for the scanner to identify the barcode boarders. It`s much better if these areas will be the same color as barcode background. For most two-dimensional matrix symbologies, the requirements for the presence of free zones are less stringent or absent. Most modern scanners contain more powerful controllers and "intelligent" decoding algorithms to read barcodes printed without blank areas.
Next topic: Save Changes
Previous topic: Watermark
Need help?
Connect with us
New to Xin 365?
Sign up today