Setting
Ref Code
Ref (Reference) Code is a unique code consistently assigned to each business document. It's a code consisting of numbers or letters (or a combination of them). In Xin 365, all records including Sales, Purchase, Marketing and Database are given a Ref Code. It can be unique or not unique depending on your setting.
How to set it in Xin 365
1. On the left menu, choose Setting > System Setting. Expand the Ref Code tab. Choose Quotation.
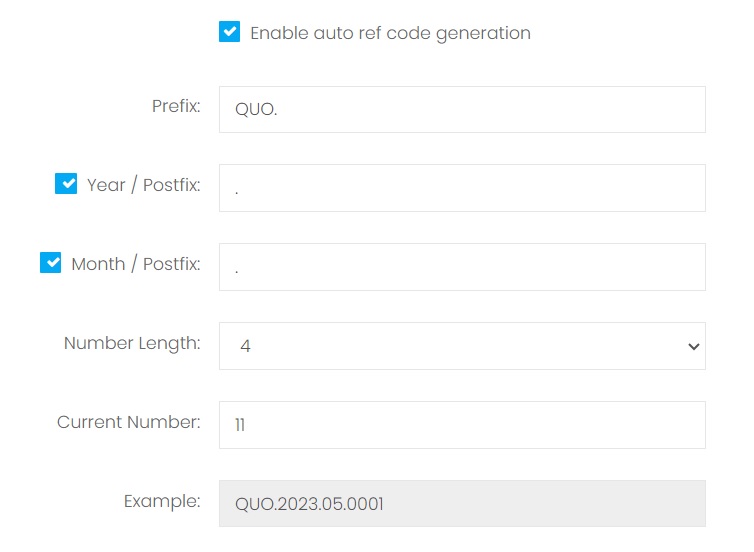
2. To enable the Ref Code auto genration, make sure the option Enable auto ref code generation is selected.
| Column | Description |
|---|---|
| Prefix | It is an affix which is placed before the code. It can be alphabet, number or symbol and should be able to identify the business module. |
| Year / Postfix | Select this option to include the current year value when the document is generated in the ref code. Enter a postfix which will be displayed right after the year value. |
| Month / Postfix | Select this option to include the current month value when the document is generated in the ref code. Enter a postfix which will be displayed right after the month value. |
| Number Length | The length of the auto running number. Example: Number length 1
|
| Current Number | The current running number of the selected module. Example if the Current Number is 11, when generate a new quotation, the Ref Code will be QUO-0011. |
3. After configured the setting, choose Save & Stay from the floating buttons on the bottom right of the page. To continue set for other modules, choose Quick Access from the top right of the page to easily switch to the setting page of other modules.
4. If you have your own set of reference code and do not want the system to auto generate the Ref Code, unselect the option Enable auto ref code generation . When create a new business document, you will need to enter the Ref Code in the input form manually.
Next topic: Customer Group
Previous topic: Additional Info
Need help?
Connect with us
New to Xin 365?
Sign up today